3D generation tools are getting really good at one thing: getting you to a usable first draft fast. But “usable” means different things depending on whether you’re building a game prop, a product mockup, an AR asset, or something you plan to 3D print.
This review walks through what Tripo 3D AI is, what it consistently does well, where you should expect friction, and how to judge whether it fits your pipeline. In the end, I’ll also point you to a simpler, image-first alternative—See3D Art AI—if your main goal is turning a photo into a 3D model quickly.
Quick verdict
Tripo 3D AI is great at:
- Fast draft asset creation from text and images (especially when you’re iterating on ideas).
- Producing convincing “looks good in a viewer” results for many props, stylized objects, and concept assets.
- Offering a broader toolchain than many single-purpose generators (multi-view generation, optimization features, and texturing options depending on plan).
Tripo 3D AI is not great at (yet):
- “Game-ready out of the box” topology with strict budgets and perfect UVs.
- Precision modeling (CAD-like accuracy, hard tolerances, exact proportions) without manual cleanup.
- Thin structures and tricky silhouettes from a single image (think wires, straps, antennae, spindly chair legs).
If you mainly want “upload one product photo → get a 3D model” with minimal setup, it’s worth also trying See3D Art AI and its image-to-3D tool as a faster, more focused alternative.
What Tripo 3D AI is (in plain language)
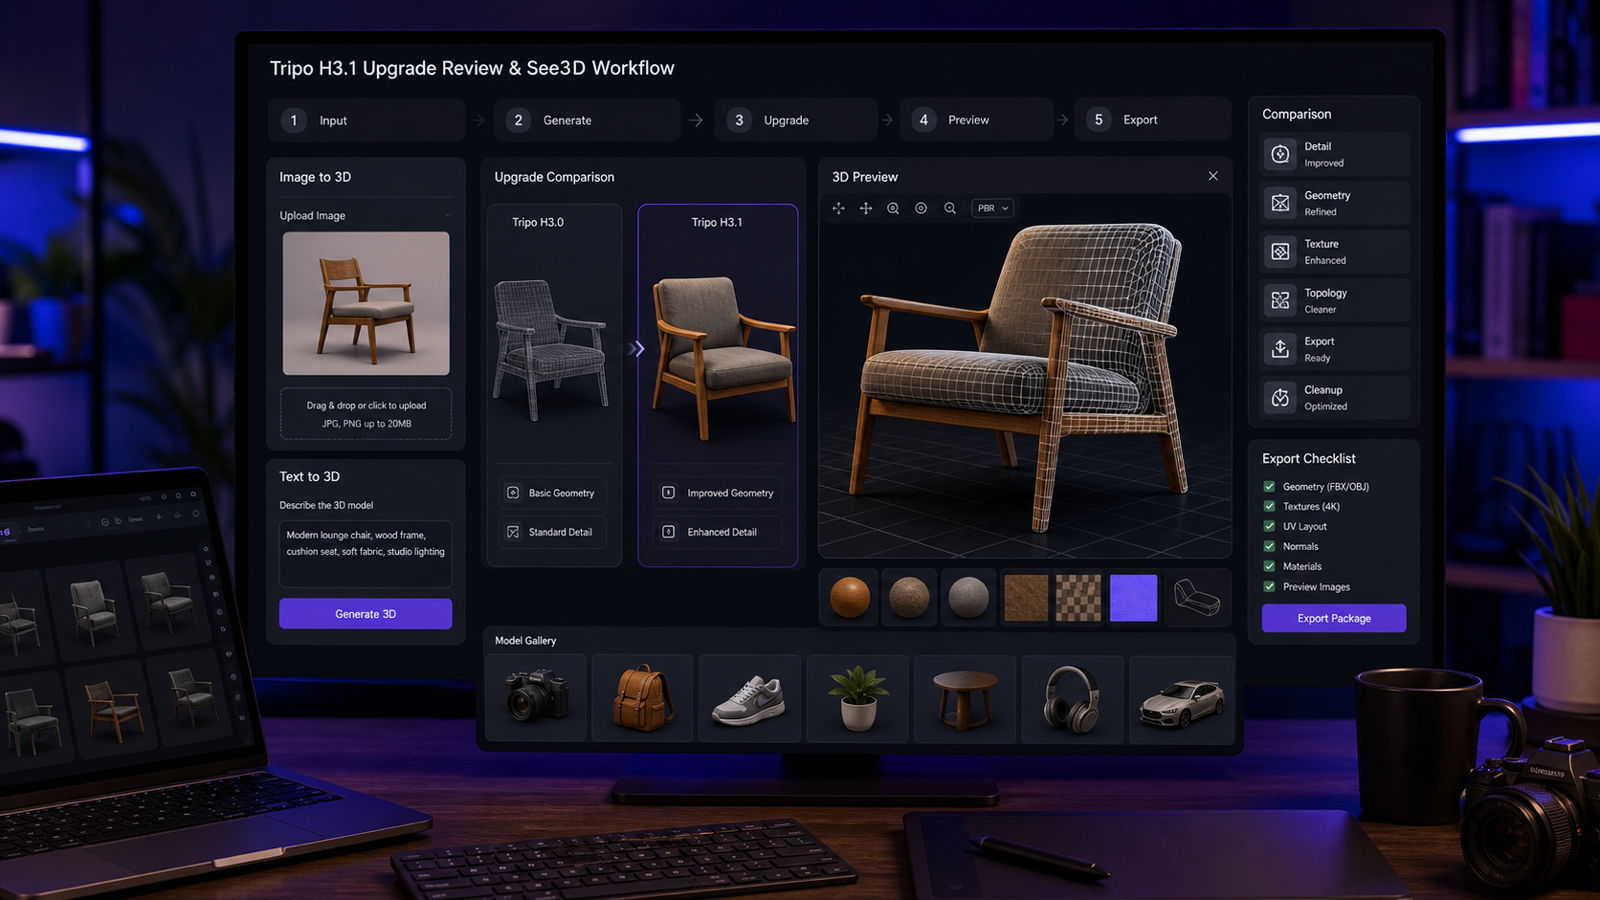
Tripo is an AI 3D creation platform that turns text prompts or images into 3D meshes, then lets you refine the result through a more production-oriented pipeline: multi-view generation, part segmentation/completion, low-poly optimization, and AI texturing features (availability varies by plan).
Tripo also positions different model versions for different goals (speed vs accuracy vs detail). In its own documentation, it describes a lineup including v1.4 (fast), v2.0 (accurate/PBR), v2.5 (balanced), and v3.0 (more powerful, “sculpture-level geometry precision with sharp edges”).
What Tripo is great at
1) Getting you to “something workable” quickly
If your workflow is: idea → quick draft mesh → refine in Blender/Maya/Substance → ship, Tripo can be a meaningful speed-up. The biggest benefit is not that every output is perfect—it’s that you can explore variations fast and pick a winner.
2) Stylized props, concept pieces, and mid-detail assets
Tripo tends to shine when the subject is:
- A single main object (not a cluttered scene)
- Medium complexity
- Visually forgiving (stylized, slightly exaggerated shapes)
Think: fantasy props, furniture concepts, simple accessories, food models, “toy-like” or game-art styles.
3) Higher quality when you can provide better inputs
Like most 3D generators, Tripo is heavily input-dependent. Results improve when:
- Your prompt is specific about the silhouette and materials.
- Your image input has clean lighting and a clear subject.
- You can use multi-view (multiple angles) for shape stability.
Where Tripo struggles (and why you should care)
1) The “looks good” trap: topology and UV reality
Many AI 3D models look excellent in a built-in viewer, then you export and discover:
- Non-ideal topology for deformation
- Messy edge flow
- UV stretching or inconsistent texel density
- Areas that need manual retopo or cleanup
If you’re shipping to a game engine, this cleanup step is normal—just don’t budget as if Tripo eliminates it.
2) Thin or complex geometry
Single-image reconstruction is still fundamentally guessing what’s behind the object. Thin parts (cords, straps) and complex negative space (chair spindles, ornate railings) are common failure points.
3) Consistency across generations
If your project needs multiple variations that still feel like the same product line (consistent design language), you’ll often need:
- Strong prompt constraints
- Multiple attempts
- Or a post step: manual edits + texture standardization
The fairest way to review Tripo (a simple test plan)
If you’re evaluating Tripo for real work, don’t judge it by one lucky generation. Run a small test suite:
A) Test three object types
- Simple hard-surface (mug, boxy speaker, toolbox)
- Organic (shoe, plush toy, fruit)
- Thin/complex (glasses, headphones, chair)
B) Score each result on five pillars
- Silhouette accuracy: does it match the intended shape?
- Topology sanity: are there obvious holes/non-manifold areas?
- UV/texture usability: can you reasonably reuse the textures?
- Editability: can you clean it up without fighting the mesh?
- Repeatability: do 3 runs produce similar “families” of results?
C) Compare against a quick alternative
Run the same photo through See3D’s image-to-3D converter and compare:
- shape stability
- texture quality
- how much cleanup you’d need
This isn’t about “which is universally better”—it’s about which fits your workflow.
Workflow 1: Text-to-3D (how to get better results)
Text-to-3D is best when you’re exploring ideas rather than recreating a specific existing object.
A prompt template that works
Use this structure:
(1) Subject + function → (2) style → (3) materials → (4) constraints
Example:
“A compact handheld sci‑fi scanner device, retro-futuristic industrial design, matte black polymer + brushed aluminum accents, clean silhouette, no thin antennae, medium detail, game-asset friendly.”
What to avoid
- Overloading style keywords (too many competing aesthetics)
- “Photoreal” + “anime” + “low poly” in one prompt
- Tiny text, logos, and intricate filigree (these usually break)
Text-to-3D prompt ideas (ready to use)
- Stylized prop: “A potion bottle with chunky cork, hand-painted ceramic style, simple label shape, no readable text, warm fantasy colors.”
- Hard-surface: “A modern desk lamp with clean geometric forms, matte metal, minimal seams, smooth curvature, realistic proportions.”
- Creature mascot: “A toy-like dragon figurine, smooth surfaces, big eyes, no tiny spikes, sculpted plastic look.”
- Product mock: “A compact wireless speaker, rounded rectangle body, fabric grille texture, simple buttons, no branding.”
- Game pickup item: “A glowing rune stone, slightly chipped edges, fantasy style, strong silhouette, medium poly.”
Workflow 2: Image-to-3D (the input rules that matter)
If you want the output to resemble a real object, image-to-3D is usually the better starting point.
Use images like these
- Clear subject, centered
- Soft, even lighting (avoid harsh shadows)
- Minimal occlusion (don’t cover the object with hands)
- Simple background (or at least strong subject separation)
Avoid images like these
- Glossy reflective objects on messy backgrounds
- Busy scenes with multiple objects competing
- Extreme perspective distortion
A quick “first export” checklist
Before you celebrate, check:
- Does the back/underside look reasonable?
- Are thin parts fused or missing?
- Are there obvious holes or exploded surfaces?
- Does the texture look painted-on (projection artifacts)?
If your goal is purely “photo → 3D model fast,” try the same image in See3D Image to 3D as a sanity check for speed and stability.
Multi-view: when it’s worth the effort
Multi-view helps because the AI has fewer blind spots. It’s most worth it when:
- You care about shape fidelity (product design, recognizable objects)
- The object has a complicated backside
- You need fewer “AI guesses” in hidden areas
If you can’t capture multiple angles, plan for extra cleanup time.
Texturing: what to expect (and what not to expect)
AI texturing is one of the most practical upgrades in modern 3D generators—because a decent mesh with good textures can be “good enough” for many visual use cases.
Tripo describes texturing tools aimed at production pipelines, including PBR-style outputs (base color, normal, roughness, etc.), plus localized fixes (a brush-like tool) and higher-resolution options depending on plan.
Reality check:
- AI textures can look great for previews and prototypes.
- For hero assets, you’ll still want manual material work (especially for fabrics, metals, and consistent art direction).
Pricing and plan differences (what to pay attention to)
Tripo uses a credit system plus plan limits like concurrent tasks, history, and plan-exclusive features.
Here’s the part that usually matters most:
- Free tier: good for testing the workflow, but limited concurrency, history, and often public model licensing.
- Mid tier: typically where multi-view, batch generation, and more retries show up—this is what makes it usable for real projects.
- High tiers: mainly about throughput (more concurrency), higher caps, and fewer constraints.
When comparing value, don’t just look at monthly price—look at:
- how many models you can generate per month for your target quality
- how many retries you need on average
- whether you need multi-view
Who should use Tripo (and who shouldn’t)
Tripo is a strong fit if you are:
- An indie creator who needs fast drafts
- A designer pitching concepts and needs quick 3D visuals
- A team generating lots of background props
- A marketer who wants 3D assets for product pages and short video spots
Tripo is not the best fit if you need:
- CAD-level accuracy
- Perfect game topology with strict budgets, instantly
- Guaranteed clean geometry for 3D printing without repair steps
Recommended alternative: See3D Art AI (when you want simplicity)
If your use case is image-first—especially product photos, portraits, simple objects—See3D Art AI can be a great alternative to try alongside Tripo.
- Start at See3D Art AI if you want a lightweight, beginner-friendly workflow.
- Use See3D’s image-to-3D tool when your primary goal is turning a single image into a 3D model quickly.
A practical way to decide:
- If you need text-to-3D ideation + multi-view + a broader toolchain, Tripo may fit better.
- If you just want “upload a photo → generate → download” with minimal friction, See3D often feels more direct.
Final thoughts
Tripo 3D AI is best understood as a speed tool—a way to generate promising first drafts, not a magic “skip all 3D work” button. When it hits, it can save hours. When it misses, it can still save time by giving you a starting point—as long as you budget for cleanup and iteration.
If you’re deciding today, the most honest recommendation is to run the same 2–3 objects through both:
- your preferred Tripo workflow (text-to-3D and/or image-to-3D)
- See3D Image to 3D for a fast comparison
Pick the one that gets you closest to “usable in my pipeline” with the least frustration.