Ever wished you could grab a single image—like a product photo, a quick concept render, or a clean screenshot—and turn it into something you can rotate, inspect, and actually use in a 3D workflow?
That’s exactly what Image to 3D on See 3D is built for: a fast, practical way to convert a 2D image into a usable 3D model, with textures, preview, and download.
In this guide, you’ll learn the easiest, most reliable way to get good results (and what to do when the first output isn’t perfect—because that’s normal).
What “Image to 3D” really means (in plain English)
When people say “image to 3D,” they usually mean: take a single 2D image and reconstruct a 3D object that looks like what’s in the picture.
An AI tool will estimate depth, shape, and surface details, then build a 3D mesh and “wrap” the visual appearance onto it.
So instead of a flat image, you end up with a model you can rotate, place into scenes, and edit.
If you’ve been looking for a quick image to 3D converter that doesn’t demand a full photogrammetry setup, this workflow is the sweet spot.
Why use See 3D instead of manual modeling?
Manual modeling is amazing—but it’s also slow when you just need a solid starting point.
See 3D is most helpful when you want:
- A fast draft of an image to 3D model for prototyping
- A quick product asset to test layouts, lighting, or angles
- A “good-enough” base model you can clean up later in Blender or your favorite tool
- A shortcut from photo/render → 3D preview → export
Think of it like this:
- AI gets you to 70–90% quickly.
- You decide if you need the final 10–30% (touch-ups, topology, texture cleanup).
Before you upload: 60-second prep tips for noticeably better models
If you want stronger results, the biggest win is not a secret setting—it’s choosing the right input image.
1) Use a “single subject” image
Pick a photo with one main object clearly separated from the background.
- ✅ Great: product photos, isolated props, clean portraits, single items
- ❌ Tough: busy scenes, crowds, cluttered backgrounds
2) Prefer a 3/4 angle when possible
A slight angle helps the model “understand” depth better than a perfectly flat front view.
3) Avoid shiny/transparent objects (when you can)
Glass, mirrors, and reflective surfaces confuse reconstruction because the surface doesn’t visually match the real shape.
4) Quick optional edits (worth it)
If you can do just one quick edit:
- Crop tight to the object
- Brighten shadows so details aren’t lost
- Remove background clutter if it’s distracting
These tiny tweaks can improve the final 3D more than you’d expect.
Step-by-step: Convert an image into a 3D model on See 3D
Here’s the simple workflow you’ll use every time.
Step 1 — Open the tool and upload your image
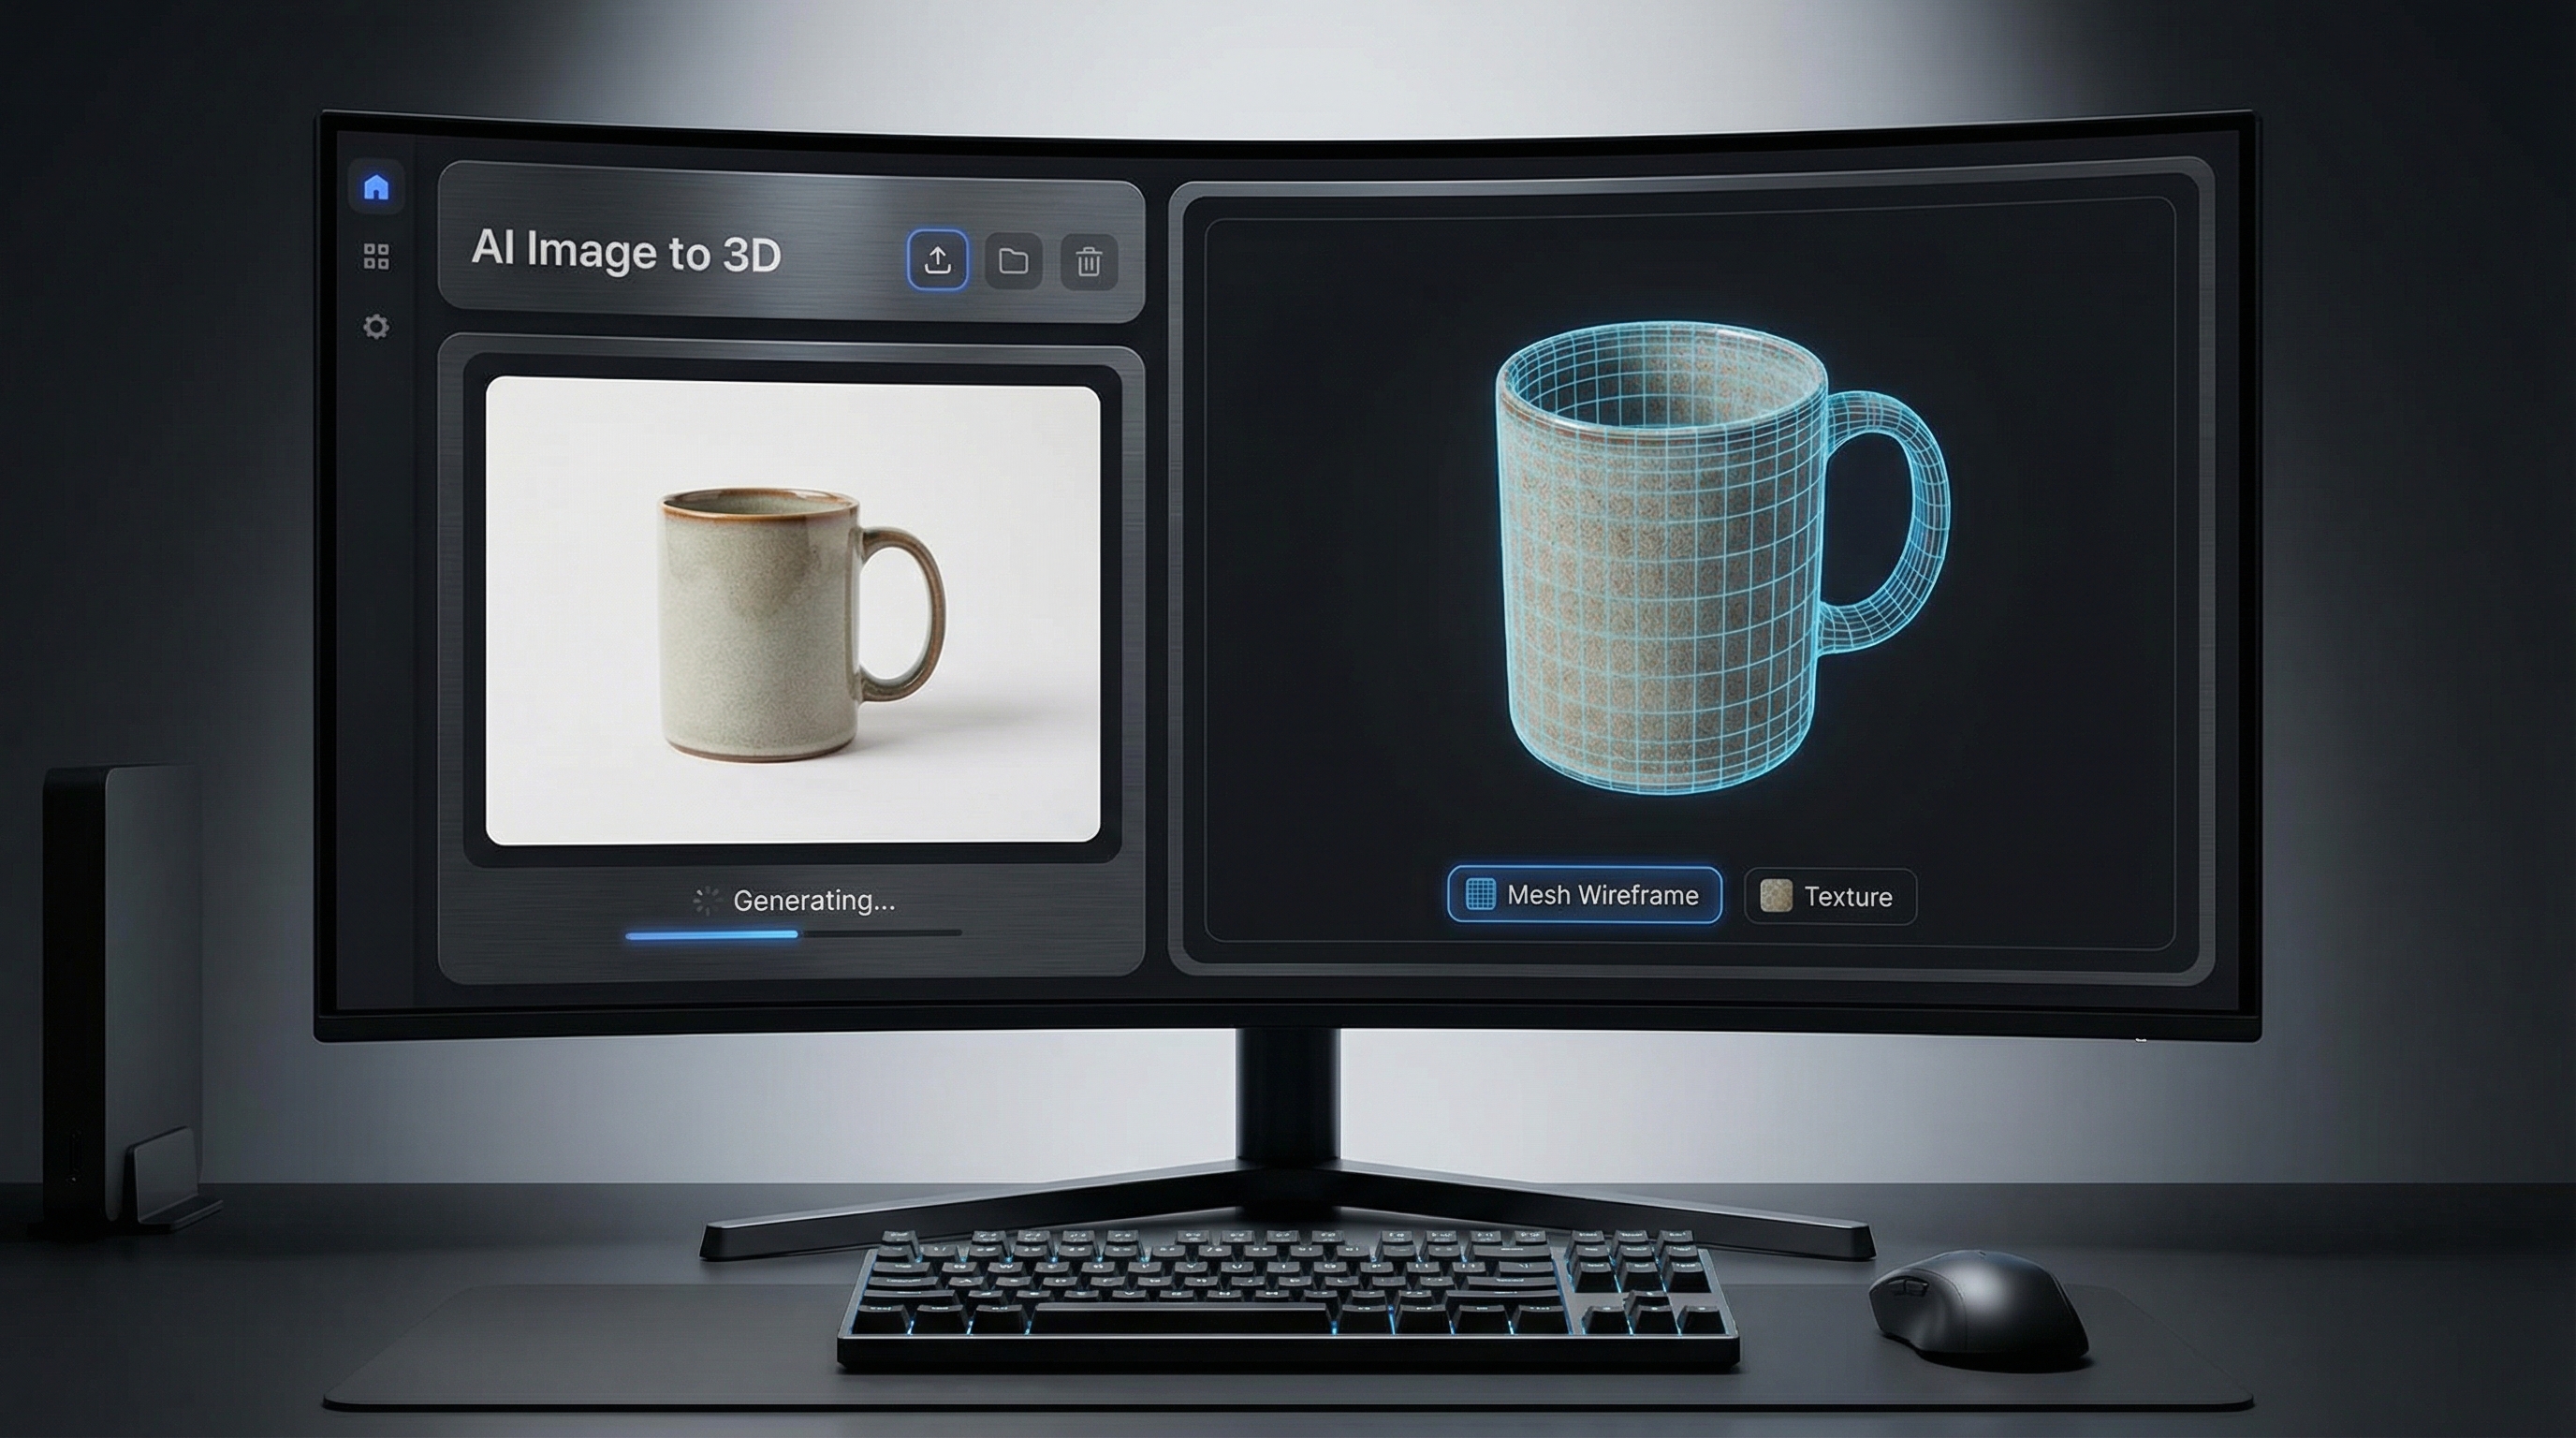
Go to AI Image to 3D and upload your file.
See 3D supports common formats (like JPG/JPEG, PNG, and WebP). Once your image is loaded, you’re ready to generate.
Tip: If you’re testing the tool for the first time, use a clean product photo (headphones, shoes, a toy, a simple accessory). You’ll instantly understand what “good input” looks like.
Step 2 — Generate the model
Click generate and let the system do its work.
Behind the scenes, it’s doing a few big things:
- Estimating the object’s structure and depth
- Creating a 3D shape from that guess
- Building the surface and projecting details onto it
Don’t worry if the first result isn’t perfect—AI conversion is often iterative. Your goal is to get a usable base quickly.
Step 3 — Preview like a pro (30-second quality check)
When the preview appears, don’t just spin the model randomly.
Use this quick checklist:
- Silhouette: does the outline look right from multiple angles?
- Proportions: anything stretched or squashed?
- Missing parts: straps, thin edges, handles, legs?
- Surface artifacts: spikes, holes, weird bumps?
- Texture: does the appearance look clean and readable?
If 3–4 of these look good, you’re already winning.
Step 4 — Download your 3D model
Once you’re happy, export your model via Image to 3D model download.
This is the point where your workflow branches:
- If you just need a quick preview asset, you may be done.
- If you want a polished asset, you’ll likely do a quick cleanup in a 3D editor.
Understanding your output: mesh vs texture (so you know what to fix)
When you generate from an image, you’re getting two main “layers” of results:
1) The shape (mesh)
The mesh is the 3D geometry—basically the object’s form.
If your mesh is messy, you’ll see issues like:
- Lumpy surfaces
- Thin parts missing
- Strange bulges
- Holes or broken edges
This is why people often refer to the result as an image to 3D mesh—it’s the structure you’ll build on.
2) The look (texture)
The texture is the visual skin of the model.
A lot of “wow” comes from a clean texture, because it hides small geometry imperfections.
If you’re aiming for a textured 3D model from an image, the best inputs usually have:
- Even lighting
- Clear details
- Minimal harsh shadows
- High contrast between object and background
Common problems (and fixes that actually work)
Let’s keep this super practical.
Problem: The model looks melted or lumpy
Why it happens: the input image doesn’t provide strong shape clues.
Fixes:
- Try a sharper image with better lighting
- Choose a 3/4 angle instead of flat front
- Crop tighter so the object is larger in frame
Problem: Thin parts are missing (straps, handles, legs)
Why it happens: thin details don’t show clearly against the background.
Fixes:
- Use an image where thin parts contrast clearly
- Avoid dark-on-dark areas
- If possible, choose a different photo angle
Problem: Texture stretching or messy seams
Why it happens: single-image texture projection has limited information.
Fixes:
- Re-generate from a cleaner crop
- Reduce harsh lighting and shadows
- If you can, do a quick texture cleanup in Blender
Problem: Jagged edges or rough surface
Why it happens: complex outlines + background noise can create “edge confusion.”
Fixes:
- Use a cleaner background
- Reduce clutter
- If needed, smooth/decimate the model after export
Best use cases (where this tool shines)
Here are situations where converting a 2D image into 3D is genuinely useful.
Product and ecommerce visuals
Turn a product photo into a quick 3D model so you can:
- Test lighting setups
- Create spins or mock 3D scenes
- Build quick marketing visuals
Concept art → 3D blockout
If you have a concept render, you can convert it into a base form to:
- Explore camera angles
- Check scale and proportions
- Use as a placeholder in a scene
Indie game props and fast drafts
Even if you plan to remodel later, a fast AI output helps you move quickly.
Photo vs image vs picture: does it matter?
In casual conversation, people say “photo,” “image,” and “picture” interchangeably—but here’s how it usually plays out in practice:
- A clean product photo often gives the most realistic base: photo to 3D model
- A broad “image” category includes renders and illustrations: image to 3D model
- A “picture” might mean a quick phone shot or screenshot: picture to 3D model
If you’re using a casual phone shot, just apply the prep tips (crop, brighten, simplify background) and you’ll usually get a big improvement.
The 20-second quality checklist before you export
Before you hit download, quickly confirm:
- The silhouette looks correct from multiple angles
- No giant spikes or holes
- The texture is readable (not smeared)
- The model fits your purpose (prototype vs final asset)
If all four are “yes,” export it and move forward.
Mini FAQ
Can I generate a 3D model from just one image?
Yes—this workflow is designed for single-image conversion, though results depend heavily on image quality and clarity.
Why does my model look different from the original?
Because the tool is estimating hidden geometry (parts you can’t see in one image). That estimation can be imperfect, especially for thin parts or complex shapes.
Can I edit the model after downloading?
Absolutely. Many creators export the base model, then clean it up in a 3D editor to refine geometry, textures, and edges.
What images work best?
Single-object images with clean backgrounds, good lighting, and clear edges.
Wrap-up: Your best next step
If you’re new to this, start with one clean product photo and run the full workflow once.
After that, you’ll know exactly what to improve:
- Better lighting
- Cleaner background
- A slightly different angle
- A tighter crop
And that’s the real trick to getting great results: small input improvements lead to big output upgrades.
When you’re ready, try Image to 3D again with a “best possible” image—you’ll be surprised how much cleaner the mesh and texture become.